


Here we go!
1. I'm assuming this is for a dress. Put the right sides of the fabric together where the zipper will be placed.
Pin in place. On most dress patterns with zippers, you will have a 'notch' to stop at. Pin all the way down to the notch. Do not sew up the back skirt yet, do that after the zipper is in. Believe me, it's much easier. Be sure your back seams match at the waist! You don't want the back to zip up showing the seams off. See where the black meets the red? Those are your waist seams, get them even.

2. Take the dress to the sewing machine and BASTE a 5/8" seam line with your machine. If you don't have a basting stitch, use a double-long stitch.


How are you doing so far? It's not too hard yet!
4. Make sure your zipper works! Close the zipper and lay it right side down on the seam, so the zipper lays right on the basted opening. Iron down the extra tape on the zipper at the top (if there is extra), and place about 1/4" under the neck seamline. Using clear tape, tape in place all the way down to the notch. Regardless of the instructions, this works the best.

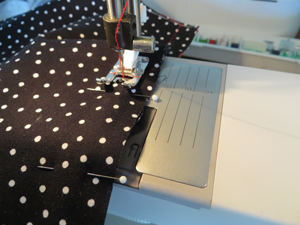
5. Turn the dress right side out carefully. Use a matching thread and a zipper foot for this step, and change to your straight stitch. If you don't have a zipper foot, just be careful to 'feel' where the zipper is so you don't sew over it. You can start at the bottom where the skirt is open if that is easier.
Start sewing at the notch, sewing straight up to the top, on the right, stop 2" before reaching the pull. I cut the thread and carefully scoot the dress back to the bottom instead of turning the dress. Sew the left side, stop 2" down from the pull.


6. I now have a sewn line on each side of the zipper. I need to finish the top and bottom and I do this separately so I don't make a mistake. At the top, pull out some basting stitches and open the zipper down to where you stopped to get it out of the way - that is why you stopped by the way. It will push your foot off a bit making the line crooked. Finish sewing to the top, back stitching to secure.


Zipper is in place!


8. Now finish the skirt bottom. With the dress inside out, put the skirt back pieces right sides together. Pin in place. Start where you stopped at the notch. Just make sure your seam isn't pinched anywhere. Sew a 5/8" seam.


Here is a picture of where I started. In the 50's they used pinking shears for seams. These are play dresses, so I took the easy route for the skirt seams.

9. Now, pick out the rest of the basting stitches. Make sure all the tape is off before trying to zip the dress down. Change your needle on your machine. It will be sticky from the tape.


No comments:
Post a Comment