Google+
Holiday Crafts & Recipes! Embroidery Tutorials Recipes for Desserts & Sweet Treats Dinners & Sides Tea and Coffeetime recipes! Like Joyous Notions on Facebook! Connect with Us! Contact Us! Home Join Our Blog Hops!
Shop Joyous Home!
The Homemakers's Resource Guide on Joyous Notions

Tuesday, July 30, 2013

Strawberry Crumb Bars

Shortbread is a true tea and coffee treat! Whenever I mix shortbread with strawberries, I always think of My Fair Lady... "Those strawberry tarts are first rate. I wonder where Mrs. Pierce gets them?"

Strawberry Crumb Bars


Grease a 9" x 9" baking pan. Cut a piece of parchment paper 9" wide (to fit the pan), with a few inches of overhang on the other two sides. These will be the handles you will use to lift the bar out of the pan. Smooth the paper into the pan and set aside.

In a bowl, whisk together:
     2 cups flour {You can do a half-and-half mixture of freshly ground wheat flour and unbleached white flour, or all freshly ground soft (pastry) wheat flour, or all unbleached white flour}
     2/3 cup sugar
     1 tsp. baking powder
     1/2 tsp. sea salt
     2 tsp. finely grated lemon zest

Whisk together. Add 3/4 cup butter, slightly softened and cut into small pieces. Use a fork or pastry cutter to cut the butter into the flour until the mixture resembles coarse crumbs.

Press a little more than half of the crumb mixture in the bottom of the pan. Cover with about 1 1/4 cups of strawberry preserves; you can adjust this as you wish, more or less. I used about 1 cup of strawberry jam, but I think I will use 1 1/3 cups next time!

Sprinkle the rest of the crumb mixture evenly over the top. Bake at 350 degrees for 30-35 minutes, just until the top is lightly golden brown. Don't over bake these; the lighter they are, the better.


Cool completely in the pan. Lift bar out of the pan by the parchment paper handles and cut into small squares.


I loved these bars, and they are so easy to make. I thought of some yummy substitutions to try next time!

~ Raspberry Cheesecake Bars: substitute 1/4 cup of the butter for 1/4 cup of cream cheese. Use raspberry jam instead of strawberry.

~ Chocolate Coconut Bars: add 2/3 cup of chopped toasted coconut to the crumb mixture. Sprinkle 1 cup of dark chocolate or butterscotch chips over the pressed crumb mixture. Top with the remaining crumb mixture.

Jessica

Monday, July 29, 2013

Crockpot Meals: Chicken and Dumplings

I wasn't sure how often I was going to use my crockpot when I got it, but now I'm so glad I got that for Christmas! I love using it. Even though there is only two of us to cook for right now, I love being able to start dinner early, and add things in here and there over the afternoon.

I'm currently looking for more good crockpot recipes, if anyone has recipes they would like to share, please do! I made chicken and dumplings on Saturday, thought I'd share the recipe...

Chicken and Dumplings


It's been a little strange planning meals and making up recipes for only two people. It took a while for me to start seeing things in little portions and sizes. I've cooked for years with several pounds of meat for a big family, not one chicken breast in the pot for two of us! I'm sure I'll laugh one day thinking back on when dinner was one piece of chicken...

This recipe makes about 6-8 servings. I always plan about 1 lb. of chicken per meal for us, and this made plenty. Double or triple this recipe according to the size of your family. A doubled recipe would still fit in the crockpot, but if tripled I would use a big stock pot, over low heat.  

Turn on the crockpot to high, and add 1/4 cup butter and 1- 1 1/2 lb. of chicken chicken breast. Heat just until the butter is melted and the pot is hot. Add:
     1 tsp. dried thyme
     1-1 1/2 tsp. ground black pepper (I love extra pepper!)
     1/2 tsp. crushed rosemary
     1 tsp. dried Italian seasoning
     1 tbsp. mined garlic
     2 1/2 tsp. sea salt
     3 cups water


Cover and cook on high in crockpot (medium heat for stovetop) for 2 hours. Then add: 
     1 large onion, chopped
     2 cups carrots, thickly sliced
     1 1/2 cups celery, thickly sliced
     1/4 cup chopped celery leaves
     3 cups of water, or chicken broth (I added 1 tbsp. of chicken bouillon and 3 cups of water)
     1/3 cup white wine or sherry (optional)     

Cook for another 2 hours on high, until vegetables are tender. 


Remove the chicken breast and shred it into large pieces. Add the chicken back into the crockpot. Taste the broth and add any extra salt or spices needed. Ready to make the dumplings!


The Dumplings

In a bowl add: 
     1 1/4 cups soft wheat flour 
     1 cup unbleached white flour (I love the King Arthur brand of unbleached flour!)
     1 tbsp. baking powder
     1 tsp. sea salt
     2 tbsp. fresh or dried chopped parsley
     
Whisk together, and make a well in the center of the mixture. In the center add: 
     1/3 cup melted butter
     1/2 cup half & half
     1/4 cup water or milk 
     1 large egg

Mix with a fork just until combined. I started this in the crockpot, but moved it to a stock pot on the stove to cook the dumplings. I had figured that the dumplings would take about 1 hour minimum to cook in the crockpot, and we wanted to eat sooner. I'll start this a little bit earlier next time! Dumplings only take about 20 minutes in a pot on the stove. 

For crockpot: add the dumpling batter by 1/4 cup scoops into the pot, one scoop next to the other, not on top of each other. Cover and cook for 1 hour, or until a toothpick inserted into a center dumpling comes out clean. 

For stovetop: bring chicken soup to a low boil over medium-high heat, then add the dumpling batter by 1/4 cup scoops, just like the crockpot instructions. Lower heat to medium-low, just high enough to keep the mixture bubbling. Cover and cook for 20-25 minutes, or until a toothpick inserted into a center dumpling comes out clean. 


Dinner is ready... Enjoy the recipe! Jessica

Friday, July 26, 2013

Winners of the Final Giveaway!

The final week of the giveaway is over! Our winners for the two Crabapple Hill Gardener's Winter Angel patterns are - Kristi and Stephanie (SSparks)

Thank you ladies for participating in our July giveaway!

Stay tuned for upcoming Blog Hops here on Joyous Notions! Sign up on our newsletter if would like to receive emails for the upcoming Hops!

Have a very blessed weekend! ~ Jessica

Thursday, July 25, 2013

Peanut Butter Crunch Brownies

We normally don't make things quite like this. These have a rich, candy bar-like look to them, and taste every bit the way they look. Josh would describe these delectable bars as "precious". I agree that they came out very well! Rich, fudgy and crunchy, you must try them at least once.


Peanut Butter Crunch Brownies

Let's keep in mind that using a boxed brownie mix isn't a sin. I used Ghirardelli's Triple Chocolate brownie mix, and it was wonderful. However, you can use a good homemade fudge brownie recipe, it will be just as tasty. Personally, I have found that most homemade brownie recipes call for far too much butter and sugar, I therefore never feel like I'm gaining something by not using a mix!  

For this recipe, you'll need: 
One recipe or one box of fudge brownie mix
15 miniature peanut butter cups, chopped
2 cups semi-sweet chocolate chips
1 1/2 cups crunchy peanut butter
1/2 tsp. sea salt
2 tsp. pure vanilla extract
1 1/2 cups rice krispies

Prepare one recipe (or one box) of fudge brownie batter. Spread batter in a greased 9" x 13" dish and bake accordingly. Don't over bake - Only bake until the edges are firm and getting slightly crisp, but the center still has moist crumbs sticking to a knife inserted in the center. 


While the brownies are baking, chop the peanut butter cups. I cut each cup into 4-5 pieces. When the brownies are done, sprinkle the chopped peanut butter cups evenly over the top. No need to spread. 


Now, in a separate bowl, melt the 2 cups of semi-sweet chocolate chips. Add the peanut butter, and stir until smooth. Stir in the sea salt and vanilla. Add the rice krispies and stir to coat. Dollop the mixture over surface of the brownies, and spread carefully so you don't push the peanut butter cups around. Spread to the edges.


 Chill in the refrigerator for several hours, until completely firm. Cut into squares and keep chilled in the refrigerator. Dessert is ready! These freeze very well too, if you have extras, or would like to make this ahead. 


Have a blessed Friday! ~ Jessica

Monday, July 22, 2013

Blog Giveaway - Week Four! Crabapple Hill Embroidery Pattern

This is the fourth and final week of the Crabapple Hill embroidery pattern giveaway! If you missed the Friday announcement post for the winners of last week's giveaway, our winners from last week were... 

So far we have given the Spring - Hope, Summer - Charity, and this week are giving the Autumn - Thankfulness Angel! Plus, this week we have TWO patterns to give! Yes, two winners!

The rules for this week's giveaway are the same as the previous week's - Comment to this post (one comment per person) today (July 22nd) through Friday at noon (July 26th). And because I am so excited that Fall is getting closer, for this week's comment question, I would love to know what favorite thing you are looking forward to this Fall. Tell us and that will enter you in the giveaway!

On Friday at noon, I will draw the winners and post the winners on the blog. You will have to check the blog to see if you won!

Now, the pattern for this week's giveaway is the very lovely Winter Angel... 


Have a blessed week, ladies! Looking forward to reading your replies. =) Jessica

Friday, July 19, 2013

Week Three Winner of the Blog Giveaway!

We are really enjoying the food questions for the giveaway! While I am thinking about making banana bread before sewing, here are the two winners for the third week of our giveaway! 

The winners of our Autumn Angel patterns are Becky De Valle and P31WannaBe!  I will need you both to contact me so I can send you your prize. =) Contact me at: swtjes (at)msn(dot)com

Next week is the last week for our Crabapple Hill Pattern giveaway, and again we have TWO patterns to give away! Next week's giveaway is for the Winter Garden Angel. The giveaway post will be up on Monday morning (July 22nd)! 

Enjoy your Friday, ladies! ~ Jessica

Monday, July 15, 2013

Blog Giveaway! Week Three - Crabapple Hill Embroidery Pattern!

Week three is here for our giveaway! In case you missed it, our winner from last week was...

So far we have given the Spring - Hope, Summer - Charity, and this week are giving the Autumn - Thankfulness Angel! Plus, this week we have TWO patterns to give! Yes, two winners!

Here's how it works for this week's giveaway: Today (July 15th) through Friday at noon (July 19th), leave a comment to this post, telling us what your favorite summer dessert or treat is, and that will enter you in the giveaway!

On Friday at noon, I will draw the winners and post the winners on the blog. You will have to check the blog to see if you won!

Now, the pattern for this week's giveaway is...


Have a very blessed week!  Jessica

Friday, July 12, 2013

Week Two Winner for the Crabapple Hill Embroidery Pattern!

I think we had a good question this week, we've really enjoyed reading everyone's entries for this giveaway! Salad with yummy toppings is our family's staple dinner too for these hot summer days! Along with lots of homemade ice cream... 

Okay, the winner of this week's Crabapple Hill Embroidery Pattern is Jalynn Patterson! Jalynn, I will need you to contact me so I can send you your prize. =) Contact me at: swtjes (at)msn(dot)com

For the next two giveaways, we have TWO patterns to give away! Next week's giveaway is for the Autumn Garden Angel. The giveaway post will be up on Monday morning (July 15th)! 

Have a wonderful weekend! ~ Jessica

Monday, July 8, 2013

Blog Giveaway! Week Two - Crabapple Hill Embroidery Pattern!

We are having a giveaway each week for the whole month of July! We have four seasonal patterns to give away - Crabapple Hill's Gardner's Angel set. We are giving Spring - Hope, Summer - Charity, Autumn - Thankfulness, and Winter - Faith. This week is the Summer Angel, Charity. 

Here's how it works for this week's giveaway: Today (July 8th) through Friday at noon (July 12th), leave a comment to this post, telling us what your easiest summer dinner is, and that will enter you in the giveaway!

On Friday at noon, I will draw a winner and post the winner on the blog. You will have to check the blog to see if you won!

Now, the pattern for this week's giveaway is... 


Can't wait to read everyone's entries! Have a wonderful week! Jessica


Stitch of the Month! Silk Ribbon Embroidery - Simple Rose Spray

I thought I would start doing some simple ribbon embroidery tutorials here on the blog. Embroidering with silk ribbon has been one of my favorite hobbies for many years now, but it seems that quilting has taken over for a while! Posting tutorials will keep me working at it again!

If there is anything specific you would enjoy seeing posted in the future, please leave a comment and let me know!

Simple Rose Bud Spray


This is a simple way to make roses - placing two small, fluffy, chain stitches close to each other. This easy stitch makes some of the best petals for embroidered flowers! For this project, you will need:

Size 18 Chenille needle (a regular embroidery needle will not work for ribbon)
Size 5 Embroidery needle
2 shades of 4 mm silk ribbon for the roses, at least 18" of ribbon each
1 shade of 4 mm green silk ribbon for the leaves, at least 18" of ribbon
Green cotton embroidery floss (we use DMC embroidery floss)
----------------------------------------------------------------------------

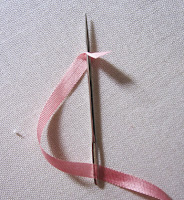
How to Thread Silk Ribbon on a Needle


1. Run the ribbon through the eye of the Chenille needle, and then insert the needle point through the ribbon, 1/4" away from the end of the ribbon, as shown. Pull the long end of the ribbon until the ribbon has slid down the needle shaft and is snug on the eye of the needle. You're ready to start!
----------------------------------------------------------------------------


1. Thread the embroidery needle with two strands of the green embroidery floss, and knot the end. Come up from the back of the fabric, and using long straight stitches, make four upper stems, about 1/2" long, and then make a 1" stem for the bottom of the flower. Finish off in the back with a knot and clip the thread.

2. Thread the chenille needle with one of your ribbon colors, and knot the end. Come up from the back of the fabric near the first stem. Insert the needle close to where you came up, and run the needle under the fabric and bring it back up about 1/4" away. Loop the ribbon around the needle as shown and pull gently through. Don't pull until it's tight, leave the ribbon puffy.


Take the needle down at the top of the stitch, and again, do not make the stitch too tight. Repeat the chain stitch again, close to the first one you just made. You can make it larger or smaller, depending on what you like. Your first flower is complete!


Make as many flowers as you like with each color. You can make smaller flowers by stitching only one chain stitch. Just remember to leave the ribbon puffy! I used cream and baby pink on my design.

Once you have finished with the flowers, complete the design with leaves. I use the ribbon stitch (yes, that's what it's called) for leaves, it's my favorite. The ribbon stitch has such a beautiful little curl on the end of each stitch!


Thread the chenille needle with green silk ribbon. Come up from the back of the fabric, and lay the ribbon flat as shown. Insert the needle in the center of the ribbon, and pull through until the little curl forms on the end. Be very careful when you're pulling! Pulling too much will pull the curl through, and the cute element of the stitch will be gone.

Finish the design with as many leaves as you like... and you are done. Happy stitching!


Blessings, Jessica

Friday, July 5, 2013

Winner for Crabapple Hill Embroidery Pattern!

Thank you all for entering this weeks giveaway! I've enjoyed reading everyone's current home projects. The winner of this week's Crabapple Hill Embroidery Pattern is April B. in KY! April, I will need you to contact me so I can send you your prize. =) Contact me at: swtjes (at)msn(dot)com

Next week's giveaway for the Summer Garden Angel will be posted on Monday morning (July 8th)! 

Have a blessed weekend! ~ Jessica

Monday, July 1, 2013

Blog Giveaway! Crabapple Hill Embroidery Pattern

We are having a giveaway each week for the whole month of July! We have four seasonal patterns to give away - Crabapple Hill's Gardner's Angel set. We are giving Spring - Hope, Summer - Charity, Autumn - Thankfulness, and Winter - Faith.

Here's how it works for this week's giveaway: Today (July 1st) through Friday at noon (July 5th), leave a comment to this post, telling us what your most recent homemaking project was, and that will enter you in the giveaway!

On Friday at noon, I will draw a winner and post the winner on the blog. You will have to check the blog to see if you won. You will only have until noon the following day (Saturday) to send me an email with your mailing information, or we will redraw for another winner.

Now, the pattern for this week's giveaway is...


Many blessings! Can't wait to see who wins! 

Jessica

Related Posts Plugin for WordPress, Blogger...