Google+
Holiday Crafts & Recipes! Embroidery Tutorials Recipes for Desserts & Sweet Treats Dinners & Sides Tea and Coffeetime recipes! Like Joyous Notions on Facebook! Connect with Us! Contact Us! Home Join Our Blog Hops!
Shop Joyous Home!
The Homemakers's Resource Guide on Joyous Notions

Tuesday, August 27, 2013

Homemaking Blog Hop Wednesdays! ~ August 28th

One thing we love to do in our work is encourage ladies in making their homes... we are so pleased to start this Homemaking Blog Hop each week! Please join us, and share your links!


Topics can include... crafting, homemaking, encouragement, recipes, homeschooling, sewing, quilting, organizing, anything that has to do with making our homes! 


At the bottom, use the link tool to share your link, title and pick your image, it's so simple! And yes, you can share multiple links. =) 


And feel free to grab our Blog Hop button to add to your blog to share the fun! 


Tuesday, August 20, 2013

Homemaking Blog Hop Wednesdays! August 21st

One thing we love to do in our work is encourage ladies in making their homes... we are so pleased to start this Homemaking Blog Hop each week! Please join us, and share your links!


Topics can include... crafting, homemaking, encouragement, recipes, homeschooling, sewing, quilting, organizing, anything that has to do with making our homes! 


At the bottom, use the link tool to share your link, title and pick your image, it's so simple! And yes, you can share multiple links. =) 


And feel free to grab our Blog Hop button to add to your blog to share the fun! 


Friday, August 16, 2013

The Blessing of Broken Dishes


   The bowls were stacked so nicely, the shades orange, yellow, and peach all coordinated in a such a desirable way. It was a lovely magazine picture, and for a moment I coveted the idea of a cabinet just like it, so perfectly arranged and color-coordinated.

   Oh, my dishes, my broken dishes. They last for less than a month, they are always hitting the floor, being chipped and dropped in the sink to break into pieces. They are left everywhere except in a nice display cabinet, and they wouldn't be worth displaying anyway because…because what?

   If I did have that imaginary cabinet, it would probably mean I wouldn't have all those hands in the house breaking all the dishes, bowls, and glasses, amongst other things.

   It might mean I wouldn't hear the sound of tiny and large feet pounding through my home, yes, getting my floors dirty. It might mean my days would have long periods of silence, instead of flowing, creative talk that often makes me more joyful than silent moments to myself.

   My perfect display of unbroken dishes might mean a clean refrigerator door, instead of crayon drawings, paper flowers, self-portraits, poems, fingerprints, school lists - love notes.

   It might mean a perfectly clean bathroom at all hours - a thought that balances on an unrealistic rope in many ways.

   A perfect anything in our home would mean no one was ever touching anything. It would mean less hands, less of something so precious, our real treasures, and the thought makes me sad. The truth is, to the world, my home is imperfect in many ways. To a society that craves the 'American Dream', we are narrow and strange.

   Most of my dishes are plastic, and not one is color coordinated. Occasionally, we'll buy real glasses, but in a month, we'll need more. We find 'pretty' plastic, and it's good enough.
   
   My refrigerator has many lists, drawings, lovely colorful pictures and fingerprints. My corners don't have pretty display cabinets. They have books, books, and oh, more books. Beatrix Potter and Winnie the Pooh live in my bookshelves, along with Long John Silver, Robinson Crusoe and many other characters that find their way to other parts of our home with the help of many hands.

    I have baskets of crayons, pencils, scissors, glue and crafty items. It gets quite unorderly. My laundry can pile up like Mt. Vesuvius, so we tackle the volcano the best we can. No where here will you find a pretty display!

   I wouldn't trade my broken dishes for a perfect display of coordinated loveliness. I like the hands, I like the noise, I like the laundry, I like the broken dishes - that will one day will be lonely for many hands.

   Don't let the broken dishes stir discontent. Savor your time with the many hands, the many broken temporaries, that leave memories; memories that can be carried into your next home - which by the way, if you know Him, is perfect.

Be Encouraged,
 Theresa

Tuesday, August 13, 2013

Homemaking Blog Hop Wednesdays!

One thing we love to do in our work is encourage ladies in making their homes... we are so pleased to start this Homemaking Blog Hop each week! Please join us, and share your links!


Topics can include... crafting, homemaking, encouragement, recipes, homeschooling, sewing, quilting, organizing, anything that has to do with making our homes! 


At the bottom, use the link tool to share your link, title and pick your image, it's so simple! And yes, you can share multiple links. =) 

And feel free to share our Homemaking Blog Hop button on your blog!


Saturday, August 10, 2013

How to Put in a Zipper

While making dresses for the fall tea, I decided to take pictures and explain how to put in a zipper.  It doesn't matter how many times I put a zipper in, I get confused each time, regardless of the instructions on the zipper pack. I bet that is why you are here too.

Here we go!
1. I'm assuming this is for a dress. Put the right sides of the fabric together where the zipper will be placed.
 Pin in place. On most dress patterns with zippers, you will have a 'notch' to stop at. Pin all the way down to the notch. Do not sew up the back skirt yet, do that after the zipper is in. Believe me, it's much easier. Be sure your back seams match at the waist! You don't want the back to zip up showing  the seams off. See where the black meets the red? Those are your waist seams, get them even.


2. Take the dress to the sewing machine and BASTE a 5/8" seam line with your machine. If you don't have a basting stitch, use a double-long stitch.


3. Most zipper instructions just say, "Machine baste opening closed. Press seam open."  Here you see that you put your RST (right sides together). You made a seam by basting to the notch. Press the seam open.


How are you doing so far? It's not too hard yet!

4. Make sure your zipper works! Close the zipper and lay it right side down on the seam, so the zipper lays right on the basted opening. Iron down the extra tape on the zipper at the top (if there is extra), and place about 1/4" under the neck seamline. Using clear tape, tape in place all the way down to the notch. Regardless of the instructions, this works the best.

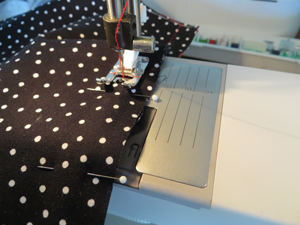
5. Turn the dress right side out carefully. Use a matching thread and a zipper foot for this step, and change to your straight stitch. If you don't have a zipper foot, just be careful to 'feel' where the zipper is so you don't sew over it. You can start at the bottom where the skirt is open if that is easier.

Start sewing at the notch, sewing straight up to the top, on the right, stop 2" before reaching the pull. I cut the thread and carefully scoot the dress back to the bottom instead of turning the dress. Sew the left side, stop 2" down from the pull.


6. I now have a sewn line on each side of the zipper. I need to finish the top and bottom and I do this separately so I don't make a mistake.  At the top, pull out some basting stitches and open the zipper down to where you stopped to get it out of the way - that is why you stopped by the way. It will push your foot off a bit making the line crooked. Finish sewing to the top, back stitching to secure.


7. Now move to the bottom.  In this step you sew across the zipper to finish off the 'rectangle' and secure the bottom in place. Turn the dress to the side and simply connect the bottom. If you are wondering why you can't start at the top, go down, turn and go up - you can. I did it this way because I didn't want my zipper to move off from the tape. You can baste the zipper and then sew, but I didn't want to sew the zipper in place twice.

Zipper is in place!

 8. Now finish the skirt bottom. With the dress inside out, put the skirt back pieces right sides together. Pin in place. Start where you stopped at the notch. Just make sure your seam isn't pinched anywhere. Sew a 5/8" seam.


Here is a picture of where I started. In the 50's they used pinking shears for seams. These are play dresses, so I took the easy route for the skirt seams.


9. Now, pick out the rest of the basting stitches. Make sure all the tape is off before trying to zip the dress down. Change your needle on your machine. It will be sticky from the tape.

Finished!!

Thursday, August 8, 2013

Crispy Potatoes

This recipe has to be a blog recipe, we make these all the time, and they are so good! These potatoes are twenty times better and tastier than pre-made french fries from the store, or the those little boxes of Shake-n-Bake that I remember Mom buying once in some long time past.

It's the flour that make them crunchy, and you can use either whole wheat flour or unbleached white flour, but whole wheat flour is best. You can use white flour, but wheat is healthier, and the coarseness of the whole grain makes the "crunchiness" far superior to the white flour in my opinion.  

Crispy Potatoes
You can cut the potatoes into cubes or french fry-style. I've done the quantity of ingredients per pound of potatoes, just multiply accordingly.


potatoes {Russet, Red or Yukon Gold potatoes are perfect!}, cubed or cut french fry-style

Place potatoes in a large bowl. For every 2 lb. of potatoes:

~ 1/3 cup flour {whole wheat or unbleached white flour}, you can add a little more if you'd like, but remember that the more flour you add, the more oil you will need because the flour absorbs the oil
~ 1 tsp. sea salt {you can add more to taste}
~ 1 tsp. ground black pepper
~ 1 1/2 tsp. dried granulated onion
~ spices, herbs any seasoning you would like, and as much as you'd like
{I love to add chili powder along with an Italian seasoning blend!}

Mix the flour and spices with the potatoes until completely coated. Now add {remember, per every 2 lb. of potatoes} 1/4 cup olive, grapeseed or vegetable oil

Depending on how much flour you added, you may need to add a little more oil. The potatoes just need to be wet but not dripping with oil. 

Place on a non-stick baking sheet or a baking sheet lined with parchment paper. Bake a 425 degrees until crisp, about 45 minutes - stirring every 15-20 minutes. Season with extra salt and pepper if necessary half way through baking. Enjoy! 

--------------------------------------------------------

Be on the lookout for our Blog Hops starting next week! Many blessings, Jessica 
Related Posts Plugin for WordPress, Blogger...