


I thought I would post a tutorial on making wheat bread in the Bosch using the Nutrimill for freshly milled grain. As a note, you can make this with Spelt, just follow the kneading times at the end. Spelt develops very quickly!

Let's put the Nutrimill together. The Nutrimill is a high impact mill. It has adjustable speeds and the hopper opening is adjustable from finer to coarse, so you can mill large grain, such as field corn or beans. The bucket can hold 20 cups of flour. The extentsion goes on top of the hopper and put the filter on top of the lid.

The separator cup snaps under the lid. Don't forget it or the mill will blow flour!
 Snap the bucket in.
 Fill the hopper with grain.
Leave about 1/2" headspace at the top of hopper. If you mound the grain up it will blow flour because you'll be overfilling it.

We set the mill to the 'r' on finer and leave the speed between high and low. Here is where you can really adjust this mill. If you were milling large beans or field corn, you would turn it to low and the hopper dial to coarser. This would slow it down and open the hopper all the way.
 This mill can be turned on and off during milling if necessary. After the hopper clears the pitch will change to a higher pitch. I let this run about 20 seconds to clear the milling heads. Pull the bucket out and tap the lid to get the flour off from underneath. Set aside for a minute. *Storage* You can store milled flour in the freezer for 4 weeks. Whole grain flour starts to go bad fairly quick. It must be kept in the freezer to maintain it's nutrients. Remember you are getting the whole grain, germ oil and all!
Get your Bosch together! The column in the Plus is removable which is great. The bowl is so easy to clean this way. Put it all together, column in from underneath and snap in place.

Put the dough hook on and you're ready! As a note, if the blender cover is not on, the mixer will not run. This is a safety precaution. I also leave my mixer unplugged until I'm ready to stand there and make my bread. The hook would surely break a little hand!

 Ingredients:
Add 6 cups of warm water to the bowl. To this add 3 Tbsp. of dough enhancer. Dough enhancer helps to keep the bread soft and keep it from being crumbly. In addition, some like to add powered gluten. I have not found this necessary unless I'm mixing low or no gluten grains with my wheat such as rye or millet. Hard wheat, Kamut and Spelt are all high gluten grains.
 We use SAF instant yeast. Add 2 1/2 Tbsp. to the bowl. We used to add this directly on top of the warm flour, but we noticed it doesn't make a difference, so right to the warm water is fine with SAF. Just be sure the water isn't too warm, because the flour is warm also. Some brands of yeast don't have temperature tolerance and too warm of water could kill the yeast.
 Add 1/2 cup of grapeseed oil. You can also use olive oil or vegetable if you don't have grapeseed. Jog a bit to mix.
 Add 1/2-3/4 cups of honey. Jog again.
 We are making a sponge. This will sit for 15-30 minutes before we add the entire amount of flour. Add 5 cups of your warm flour and jog a bit more to smooth it out.
Here it is, ready to bubble for a bit. The sponging really does help the softness of the finished bread.
 Put the cover on and let sit for up to 30 minutes. Don't go far, it could bubble up and out so keep close and jog down if necessary. Put the salt next to your mixer so you don't forget it!
 It only took 10 minutes for it to foam up and bubble this high. Jog down and watch it bubble away!

Now it's time to start adding the remaining flour. The mix is still bubbling! You'll add 1-2 cups at a time, jogging down each time. You are going to need anywhere from 10-13 cups more of flour. There has never been an exact science! The humidity seems to greatly affect the addition of flour, so we watch for signs that it's enough.
Start adding and jog down!
Start adding and jog down!

This is my mix (below) after adding 10 more cups of flour! So that makes it 15 total so far. This is what I call the chunky look. It's about now that I usually need 2-3 more cups of flour.
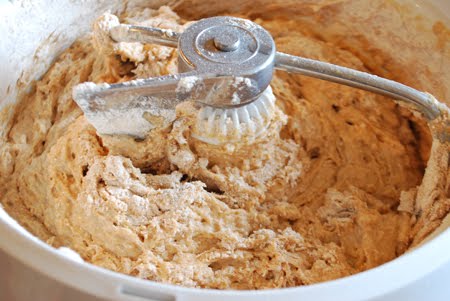


You can tell it's enough. The dough should be tacky at this point but not totally come off on your fingers, not gooey! I'll start my 5 minute time for kneading; use speed 4 for a full load like this. You can also use spelt for this recipe, but only knead 3 minutes and then check the gluten. Spelt develops fairly quickly!

Checking the gluten. Grab a little and pull upward to see if you can get a nice stretch without tearing the dough. If the dough tears, you'll need to decide if you over kneaded or under kneaded. You must be careful with spelt, so if you timed it exactly at 3 minutes, give another 40-50 seconds. It should come out fine at 5 minutes for wheat. Over kneaded dough cannot be fixed. Let it rest for 5 or 10 minutes if you'd like.
Get your pans ready by spraying them. We use Vegalene. I use 10" bread pans so I get 4 big loaves of bread. If you use 8" pans you may get 6 loaves.

Dump the dough out on an oiled counter, not a floured counter. It should come right out, the bowl totally clean. Cut the dough into portions with a knife depending on your pan size. Don't pull and stretch the dough too much. Take one portion and shape into a loaf.


Let rise till double. Set the oven at 350 degrees. It usually only takes 25 minutes for them to double. Cover with a nice bread cloth while rising. I set them close to the oven for more heat. You only rise once! That is the beauty of the Bosch. It's so powerful you cut out the need for a second rise (sponging helps too). Do not overproof. Once you can set your finger in and the dough springs back with no indent, they are done rising. Place in the oven for 26-28 minutes. They are done when they are brown and sound hollow when tapped.

Yummy homemade whole wheat bread! You can store your bread in bread bags in the freezer for 3 weeks. We don't normally store them for more than 1 week with our size family. But if you leave them on the counter for more than 3 days, they will start to go stale.
Hope this tutorial was helpful!
Happy Baking, Theresa
Happy Baking, Theresa
6 comments:
I enjoy our Bosh and Mill =) you can always tell who cooks in our house depending on whether the Bosh or KitchenAid was used =))
Mmm, your bread looks good, Mrs. Powers!! =)
Hugs,
Michelle
Thank you for this great tutorial! I have been having troble adjusting from my kitchen aid to bosch. Now I think I am overkneading it! I would love to know more about grape seed oil. That is a new one to me. I may go try this when we get home from 4H. I am working on some chicken soup for my sinus headache and bread would be yummy with it. :-)
This all looks wonderful. I do not have either of these machines and have been wanting the grain mill for a while. Still trying to figure out which one I want but I was wanting to ask a question regarding the bosch. I thought I had entered the 21st century when I got my Kitchen Aide and my hubby still calls it an overpriced stirring machine. Anywho, what makes the bosch better? It is just better at making bread? Appears that it can make greater quantities of bread which is nice. As with my hubby;s prior comments not sure I could get him to fork out more money on another 'fancy stirring machine' so I am wondering if you ladies could tell me why it is a good investment! Thanks so much ladies!
Theresa
Hi Theresa,
Well, I started with the Universal 9 years ago. I acutally had a Universal that was over 40 years old from a customer who finally wanted to upgrade!
I never owned a Kitchen Aid, but have a lot of experience from those who have made the switch. You will most certainly see the difference making bread in this machine. The Universal has a great big, heavy dough hook. The transmission is powerful (800 watt motor) and that's the key behind better gluten development with the Universal. The dough hook has a lot of power behind it. From what I remember, the KA's dough hook was rather thin and light. Those who have used it and then the Bosch are really happy with the better bread results.
Yes! The Universal Plus can hold up to 15lbs of dough. This gives us six 8" loaves or 5 10".
The Bosch mixer motor and transmission are guaranteed for 3 full years. I believe the KA had a one year. The importer is wonderful about any issues that occur.
Hope this helps! Feel free to ask more questions, we'll do our best!
Theresa
The pictures were beautiful and the tutorial was wonderful. The finished product......... mmmmmm looks so good! I could almost taste it!
Blessings, Linda
I heard your workshop on bread making via the 2008 ultimate homeschool expo. I found it in iTunes. I am glad you have posted a tutorial. My husband and I have been thinking on getting a mill and grinding fresh grain for some time. Your workshop was exactly the push I needed to take that step. Thanks for this wonderful tutorial! I will be using it soon.
Post a Comment