If there is anything specific you would enjoy seeing posted in the future, please leave a comment and let me know!
Simple Rose Bud Spray
This is a simple way to make roses - placing two small, fluffy, chain stitches close to each other. This easy stitch makes some of the best petals for embroidered flowers! For this project, you will need:
Size 18 Chenille needle (a regular embroidery needle will not work for ribbon)
Size 5 Embroidery needle
2 shades of 4 mm silk ribbon for the roses, at least 18" of ribbon each
1 shade of 4 mm green silk ribbon for the leaves, at least 18" of ribbon
Green cotton embroidery floss (we use DMC embroidery floss)
----------------------------------------------------------------------------
How to Thread Silk Ribbon on a Needle
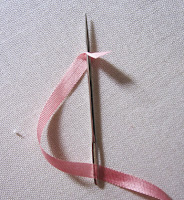
1. Run the ribbon through the eye of the Chenille needle, and then insert the needle point through the ribbon, 1/4" away from the end of the ribbon, as shown. Pull the long end of the ribbon until the ribbon has slid down the needle shaft and is snug on the eye of the needle. You're ready to start!
----------------------------------------------------------------------------
1. Thread the embroidery needle with two strands of the green embroidery floss, and knot the end. Come up from the back of the fabric, and using long straight stitches, make four upper stems, about 1/2" long, and then make a 1" stem for the bottom of the flower. Finish off in the back with a knot and clip the thread.
2. Thread the chenille needle with one of your ribbon colors, and knot the end. Come up from the back of the fabric near the first stem. Insert the needle close to where you came up, and run the needle under the fabric and bring it back up about 1/4" away. Loop the ribbon around the needle as shown and pull gently through. Don't pull until it's tight, leave the ribbon puffy.
Take the needle down at the top of the stitch, and again, do not make the stitch too tight. Repeat the chain stitch again, close to the first one you just made. You can make it larger or smaller, depending on what you like. Your first flower is complete!
Make as many flowers as you like with each color. You can make smaller flowers by stitching only one chain stitch. Just remember to leave the ribbon puffy! I used cream and baby pink on my design.
Once you have finished with the flowers, complete the design with leaves. I use the ribbon stitch (yes, that's what it's called) for leaves, it's my favorite. The ribbon stitch has such a beautiful little curl on the end of each stitch!
Thread the chenille needle with green silk ribbon. Come up from the back of the fabric, and lay the ribbon flat as shown. Insert the needle in the center of the ribbon, and pull through until the little curl forms on the end. Be very careful when you're pulling! Pulling too much will pull the curl through, and the cute element of the stitch will be gone.
Finish the design with as many leaves as you like... and you are done. Happy stitching!
Blessings, Jessica


No comments:
Post a Comment