Google+
Holiday Crafts & Recipes! Embroidery Tutorials Recipes for Desserts & Sweet Treats Dinners & Sides Tea and Coffeetime recipes! Like Joyous Notions on Facebook! Connect with Us! Contact Us! Home Join Our Blog Hops!
Shop Joyous Home!
The Homemakers's Resource Guide on Joyous Notions

Saturday, March 30, 2013

Caramelized Banana Bread

I Found this recipe and decided to give it a try, with a few changes. It looked like such a good idea, and it tastes even better. I love the smell of the bananas cooking in the butter and sugar! This recipe makes one 9" x 5" loaf, so double the recipe for two loaves.

Caramelized Banana Bread
 I'm out of wheat flour once again; I made this with the unbleached flour I had, but if I used wheat in place of the white flour, I would have used 2 1/2 cups. The next time we need company dessert, I might double this and bake it in a Bundt pan.


Slice 3 medium ripe bananas into 1/4" slices. In a non-stick skillet, melt together 4 tbsp. unsalted butter and 3/4 cup packed brown sugar over medium-high heat. Add the sliced bananas and saute` for 4-5 minutes.


Scrape the banana mixture into a mixer and beat on high speed for 1 minute. Let mixture cool for 5 minutes. Now add:
2 tbsp. sunflower or vegetable oil
1/2 cup half & half
2 large eggs
2 tbsp. golden rum (optional)
1 1/2 tsp. vanilla extract

Mix again until well combined and creamy, about 30 seconds. Add:
2 1/4 cups unbleached flour
1 tsp. sea salt
3/4 tsp. baking soda

Mix just until combined and the batter is smooth. Pour into a greased 9" x 5" glass loaf pan and bake at 350 degrees for 1 hour, or until a toothpick inserted in the center comes out clean. Cool for 10 minutes in pan on a wire rack, then remove cake from pan to finish cooling. Top with glaze while still warm. 

Brown Butter Glaze

In a small saucepan heat 2 tbsp. unsalted butter over medium heat. Cook butter until just until butter is beginning to brown. Watch carefully, the butter will burn quickly!

Remove from heat and add 1/2 cup powdered sugar, 2 tsp. half & half, and 1 tsp. vanilla extract. Whisk until smooth. Drizzle glaze over bread.  


Enjoy the recipe! Blessings, Jessica

Tuesday, March 19, 2013

March Tea Time


Raspberry Cream Tarts

You'll need one recipe of our favorite butter pastry dough. In a bowl combine: 
     2 1/2 cups unbleached white flour (or 2 cups soft wheat pastry flour and 1/2 cup unbleached white flour)
     2 tbsp. sugar
     1/2 tsp. sea salt
     1 cup chilled unsalted butter


 Use a pastry cutter or a fork to cut the flour and the butter together until the mixture resembles coarse crumbs. Drizzle 1/3 cup ice cold water over the crumb mixture and bring together with a fork, pressing with the fork until the mixture is moist. Add extra ice water as needed, one tbsp. at a time. Then use your fingers to finish pressing the dough together until it's one mass. Be careful not to knead or over handle the dough, it will make it tough.

Roll the pastry out in circle, 1/4" thick. Use a 3" ramekin dish as a guide, and cut circles with a sharp knife. Set each circle on a baking sheet lined with parchment paper. Chill until fillings are ready. 


Prepare the raspberries: In a bowl combine 1/3 cup sugar with 3 tbsp. corn starch; whisk together until no lumps remain. Add 2 1/4 cups fresh raspberries washed and patted dry. Fold raspberries into sugar mixture until completely coated. Set aside while you make the cream cheese filling.

 In a bowl, combine the following: 
     1 8 oz. package cream cheese, softened
     2 tbsp. sugar
     1/2 tsp. almond extract
     1 large egg, slightly beaten
     
Whisk together until smooth; set aside. In the center of each pastry circle, place 1 tbsp. cream cheese filling and top with a spoonful of raspberries. Drizzle 1 1/2 tsp. of the juice from the raspberries over the fillings. Fold up the edges of the pastry dough around the filling free-form style.


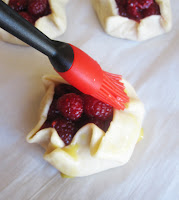
Almost done! In a small bowl, whisk together one egg white with 1 tbsp. cold water. Use a pastry brush to brush pastry of each tart and sprinkle with sugar. This will give the tarts a shiny glaze that is sweet and crunchy! 

Bake in a 375 degree oven for 20-22 minutes, until golden brown. Cool to room temperature or chill completely before serving. Store leftover tarts in the refrigerator for up 3 days.                                            ~ Makes 8-10 tarts


Turkey Pear Tea Sandwiches
Oh the simplicity of a delicious tea sandwich. Use any kind of bread you prefer; we used a bakery sourdough loaf for ours. Use deli roasted turkey, and try black pepper or maple roasted turkey. 


Cut thin slices of bread. From the slices cut either 3" squares or use a cookie cutter to cut shapes. Butter each slice of bread and top with thin slices of pear, thin slices of turkey and a sprinkle of fresh thyme leaves.


Vanilla Almond Tea


In a large pot brew 1 1/2 quarts of strong black tea, try Twinings Earl Grey. To this add:
1/2 tsp. vanilla extract
1/2 tsp. almond extract
1/4 cup fresh lemon juice, strained
1/2 cup honey or maple syrup

Stir together until all of the sugar has dissolved. Pour into a warmed tea pot and serve with cream. 

                                                                          ~ Makes about 6 servings


Wednesday, March 13, 2013

March Embroidery Stitch Lesson - Cast On Stitch

We have a March embroidery stitch lesson for you! Each month we will share a new stitch to encourage your work in embroidery. Some stitches will be advanced, others very beginner. Enjoy!

Today, the stitch is the Cast On stitch. This stitch can be used a variety of ways, the most popular way is a bullion flower, but today, we'll learn to make a simple leaf. This is a little more creative than just using a chain stitch for leaves!
This stitch is worked on top of the fabric.

1. Start by drawing a leaf. The stitch will not fill this fatter oval, it's just a guide. Bring the needle up where you want the top of the leaf to be. Make sure you have enough thread, 14", before starting.


2.  Bring the needle in at the bottom of the leaf, and come back in where you came up. Bring the thread under and around the needle...


3. Now, wrap around your finger, holding the bottom thread with your thumb, place your finger close to the needle, and cast on.

 4. For a smaller leaf, cast on about 7 stitches.


5. Holding the stitches taut with your middle finger, push the needle through.


6. Pull slightly to the left, then pull down to straighten the leaf. This leaf can be turned slightly, or rounded a bit, it's very versatile.


 7. Now secure with stitch down through. All finished! Have fun!


Finished leaves on my current embroidery project. 


Related Posts Plugin for WordPress, Blogger...