You'll need:
Small striped pumpkins - find ones that sit fairly flat
4 tapers
Melted wax - use old candles!
3/4" drill bit
Exacto knife
Strong glue - like wood glue
Pretty ribbon - 17" or more for each taper
First, take off the pumpkin stems. A pair of pliers work great to snap them off.
Put your old wax in a canning jar or use almost used up candles in jars. Fill a pan with water and place the jar in the pan. Boil until the wax is melted. Amazing, the top of the jar was not hot so you can pour easily!
Meanwhile, drill a hole through the top of each pumpkin. Once you get through the hard top, stop drilling! Brush off the dust.
Use your knife to open the hole a little more at the top if the taper doesn't fit properly. You want it be be very snug, but you don't want to break your candle trying to twist it in.
Pour wax into each candle hole, until you are 1/4" from the top. Use a cotton swab to wax the very top or roll the pumpkin a bit to cover any flesh at the top.
Allow the wax to slightly dry. Squeeze glue around the taper bottom and gently, but firmly twist the candle into the hole. Use a cotton swab to brush glue around the base of the candle on the outside.
Ribbon:
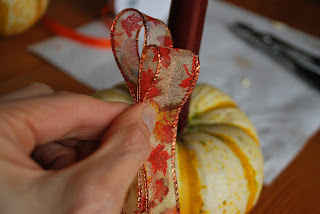
I used about 17" of ribbon. I like to make easy ribbons. Gather the ribbon into a loop.
Make a loop, the same size on the other side, hold with your thumb.
The next two loops will be a little smaller, make each side the same size. Continue decreasing in size until the ribbon is used up. Place a straight pin through the middle.
Stick the pin with ribbon, in between the candle and the base. Gently spread the loops, and pin again, once you have a nice loopy look. Repeat on the other side if you want.
That's it! I have my candles drying nicely for Thanksgiving on my shelf over my table. Place smaller votives in between the larger tapers. These only took about an hour, plenty of time to make before this Thursday! Pretty!


1 comment:
Creative and fun idea.
Post a Comment